Whatever style and size of addition you envision for your house, advance planning
is the key to a smooth construction process and satisfying results. Among other
information, this chapter includes design considerations for common types of
additions as well as a guide to complying with local building codes—and when
to hire a contractor for part or all of the many jobs that go into an addition.
__Making an Addition Look Right
Taking Nature into Account
Planning for a Livable Addition
__Expanding Up—Unobtrusively
__How to Fit On a Large Addition
__Planning the Job to Run Smoothly
Detailed Drawings for an Addition--Tips for Choosing a Contractor
Scheduling Permits and Inspections
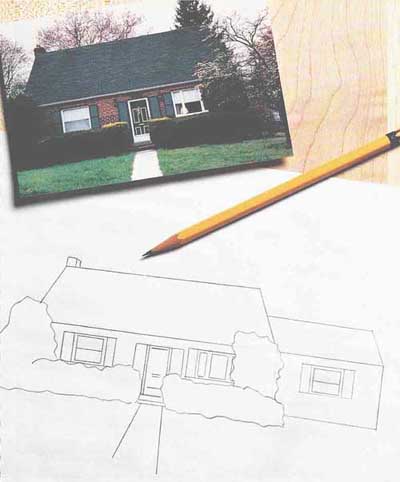 7__ A sketch for an addition 7__ A sketch for an addition
Making an Addition Look Right
Common sense suggests an ugly addition is a bad bargain: It may reduce the
value of your property, and it is often difficult to live in. Conversely, a
well-designed addition is likely to be a good investment as well as a source
of everyday satisfaction.
If you possess architectural talents, you may want to create your own design,
but most people hire a professional. Either way, the first step is to list
the use and dimensions of any new space, taking into account considerations
like those in the checklist below. Drawings of the plan will be needed to obtain
a building permit ( -- 17). An architect will do the drawings as part of the
job; if you are the designer, you can hire a draftsman or make the drawings
yourself.
Fundamental Considerations:
Site conditions, zoning ordinances, community rules, and your space requirements
all will help determine which of three basic design options to pursue: building
out horizontally from the house, building up above it, or building a major
addition. Illustrations show how each type of addition can be adapted to suit
different house styles.
Ordinarily, the architecture of an addition should echo that of the original
house. When the addition must depart from the house style, the difference should
be clear and obviously intentional; an imitation that is inexact can look as
though it is a mistake.
A Pleasing New Roof: The roof of a successful addition generally matches the
slope, overhang, and covering of the existing roof. The main exception is an
addition with a shed roof. In that case, a shallow slope often is used to contrast
with the steep slope of the house roof.
Planning Windows and Siding: If windows on an addition look like those on
the house, the addition will be less obtrusive. Horizontal spacing can vary,
although it should not seem random. Vertical alignment, however, is crucial.
If the tops of windows do not line up, the result is a distracting jagged line.
Siding generally is the simplest detail to match to the house. You may also
prefer a contrast: Combi nations of shingles, clapboard, brick, or vertical
planking are often used, although they can look fussy on a small house.
Preserving a Focus: As you weigh design options, consider how the addition
will affect the focus of the house—the exterior point that draws and holds
your eye, such as the front door or a large window. Ideally, each side has
its own focus, but front and side views matter most. An addition may replace
the original focus, but if it adds secondary focus—a large feature like a sliding-glass
door, for example—it confuses the design. Partly for this reason, many additions
are built at the rear, leaving facades unchanged.
TAKING NATURE INTO ACCOUNT:
An attractive addition that is well suited to one part of the country could
lead to trouble in another locality. In regions with heavy snowfall, for example,
roofs must be built steep enough to shed their wintry load. Just the opposite
is true in an area that is vulnerable to hurricanes:
Steep gable roofs present a large target to high winds. Roof overhangs are
also a danger there, since storms can pry off the roof by blowing under the
edge. In parts of the country where earthquakes may occur, brick chimneys are
among the elements to be avoided. Building codes take regional conditions into
account, but it is a good idea to discuss such concerns with the local building
department, which may have additional suggestions to ensure that nature and
your addition are fully compatible.
Planning for a Livable Addition:
If possible, plan for rectangular rooms, approximately half again as long
as they are wide; these are generally most comfortable.
For the best light and ventilation, locate windows on two walls.
Try to place doors near corners to provide more unbroken wall space for chairs
and tables.
Consider how each room will relate to surrounding ones, anticipating possible
problems with noise, access, and light: A noisy family room should not be next
to a bedroom, for example.
9__ 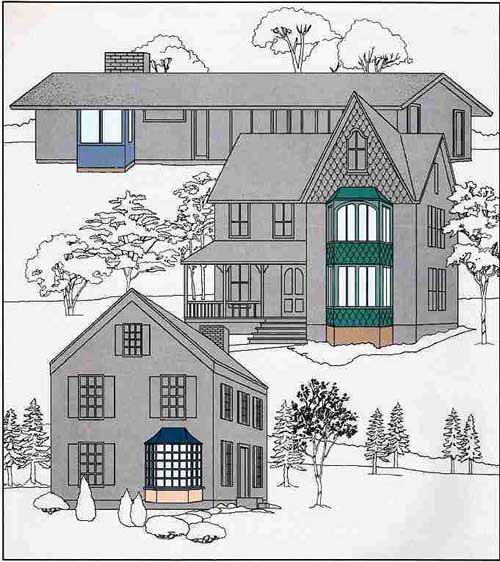
A bay window.
The classic bay window is a simple addition suiting many styles. The stock
unit, bought ready-made with a metal roofing kit, is generally designed to
adorn a traditional two-story Colonial house (bottom); here, the window is
mounted on the side of the house, leaving the appearance of the façade unchanged.
The floor of the bay is supported by floor joists that are cantilevered from
those in the original house. To create a two-story bay typical of Victorian
Gothic, you can stack two stock units—complete with traditional curved windows,
if desired. In this example, the addition is blended with the original house
by giving the bays curved-shingle siding that matches the roof gable. For a
modern ranch house, a bay can be assembled by building a shallow room extension
from ordinary window units, 2-by-4 stud framing, and a concrete-block foundation
wall.
10___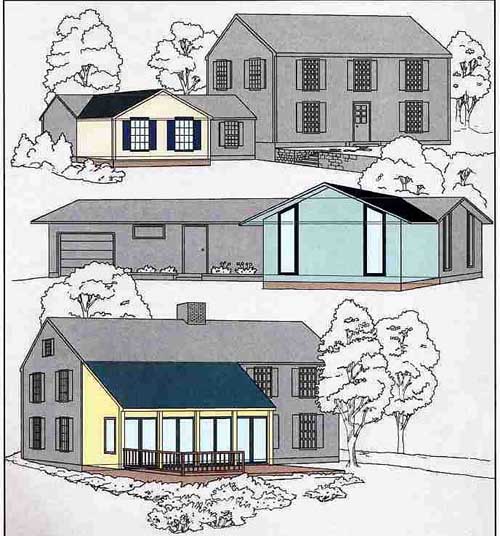
A new room.
A modest outward expansion—front, side, or back—is the most common type o
addition. To keep it from looking like a bump on the house, the addition generally
is given a roof that echoes the original. (Here and in some pictures following,
the original lines o1 a house are indicated in gray.) On a split-le house,
for example, an addition often duplicates the shape of the one-story portion.
The two roofs have the same height and so meet naturally in valleys. The same
approach works at the back or front of a ranch house (center). On a massive,
boxy house, however, it is better to extend the original shape. For example,
the walls and roof on one side of a Colonial house (bottom) can be extended
to create a traditional salt-box shape, with a half story of storage space
opposite the second floor of the house. A clash of styles between old and new
windows is averted by the distance between them and by the large-scale simplicity
of the new windows—a clear contrast to the old.
11a___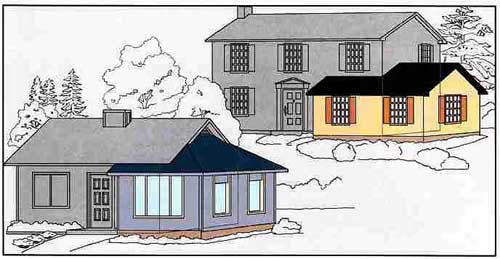
A wraparound addition.
This design is particularly suited to two special types of houses: a small
house, which would be overwhelmed by the mass of an ordinary addition, and
a house on a lot so small that local setback requirements prohibit a large
addition in one direction. For the Colonial house at top, the addition roof
is offset from the house roof but duplicates its width, pitch, and soffit detail
so well that the addition looks like a part of the house. On the Cape Cod (lower
drawing), the front edge of the house roof has been extended with short rafters,
and hips have been made from prefabricated trusses, creating a hip-on-gable
roof that matches the pitch of the original gable roof.
11b___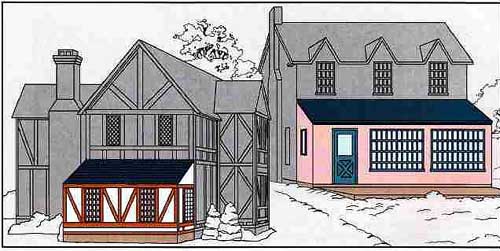
Extending an entire side.
A shed-roofed addition that extends one end of a house suits almost any style
of architecture. It is a traditional feature of American farmhouses, and because
of its simplicity, adapts to such complicated styles as the Victorian or the
Elizabethan. A shed roof that is designed with a much shallower pitch than
the original has a simple line that does not clash with the house roof or obstruct
the second-story windows. For the Elizabethan house, 1-inch boards applied
over stucco or plywood siding match the original half- timbered style. On the
large, boxy Colonial, the full-side addition preserves the lines and massive
look of the house.
Expanding Up—Unobtrusively
When the shape or terrain of a lot precludes building an addition outward,
the solution may be to build up—either with a shed dormer (below) or with a
living space above a garage . This can pose a tricky design challenge,
however: second-floor additions have a tendency to over whelm the architecture
of a house.
To avoid obvious bulkiness, many upward additions are placed behind the house.
If a second-story addition is at the side, you may be able to extend the house
roof over the addition. An abundance of windows can also make the new construction
look less massive; horizontal panels of windows near the roof look best. To
pre serve symmetry, match the existing window spacing and locate addition windows
either directly above first- floor doors and windows or centered between them.
The floor plan of the addition is determined largely by the location of the
doorway or stairway that provides access to it. You may have to build a stairway.
Try to place the lower landing in little-used space that opens off a hallway—a
linen closet, perhaps, or the corner of the garage next to the house door—and
place the up per landing in a corner of the addition.
12___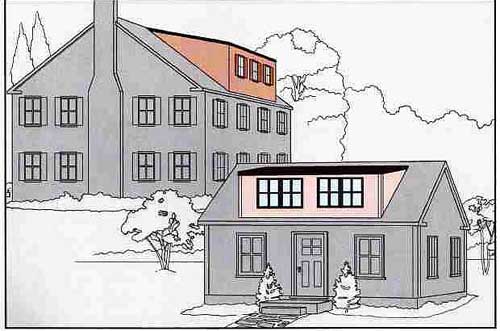
A shed dormer.
From the street, the dormer at the back of the Colonial house at upper left
is hidden by the roof, the mo common arrangement. The dormer addition on the
C Cod house above, by contrast, is located in front. Although this changes
the facade, symmetry is presented by centering the second-story windows between
the original door and windows. The ceiling of this dormer is only 7 feet high
because of the relatively low ridge of a small Cape Cod roof but the large
windows make it seem higher. Both additions cover less than two-thirds of the
roof and stop short of the overhang, leaving a border of the original roofing
to minimize their apparent size.
13___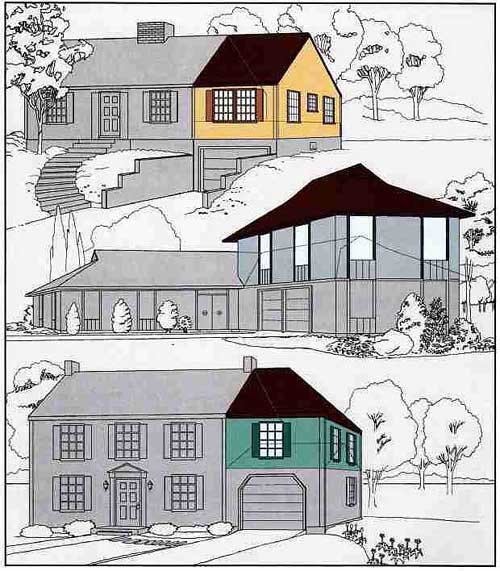
A room over the garage.
If a garage originally was covered with a sun deck, an addition can be erected
directly on this platform and then can be covered by a sideways extension of
the house’s original roof; in the example seen above, at top, the large windows
play down the size of the addition. An addition on top of the garage of a one-story
house (middle) needs a roof that matches the roof of the main house; here,
an elaborate hip-on-gable roof over a big two-car garage makes the remodeled
wing the largest, most prominent part of the house. An addition over a garage
attached to a two-story house generally can be covered by extending a gable
roof; in the example shown at bottom, a hip roof diminishes the visual bulk
of the addition.
How to Fit On a Large Addition
A massive expansion of a house—perhaps by adding a second story (below) or
by constructing a wing to one side —raises a number of practical issues
along with the inevitable aesthetic considerations. For one thing, such an
addition usually alters the traffic pattern inside the house. Care must taken
so that people do not have to walk through the kitchen to get to a bathroom
or through a bedroom on the way to a patio. Hallways may be needed, at least
36 inches wide so that furniture can be moved easily.
Traditionally, such an addition also required posts, girders, and bearing
walls to support standard floor joists; nowadays, wood I-beams that can span
a greater distance without a central support are often substituted ( -- 92).
Floors and walls must provide channels for plumbing and ducts, and floors may
need to be reinforced under heavy plumbing fixtures.
Expansion upward with a full second story, which involves removal of the old
roof, is a job usually left to professionals. It is often possible simply to
extend first-floor walls upward, matching the first-floor siding and window
style, and to top them with a new roof that exactly matches the previous one.
But the massive addition also permits radical changes in style: So little is
left of the original house that the designer has a relatively free hand.
A separate, two-story wing alters proportions radically, but because it leaves
the old roof intact, it generally is most attractive if it follows the style
of the house. The resulting house looks like the original, but bigger.
14___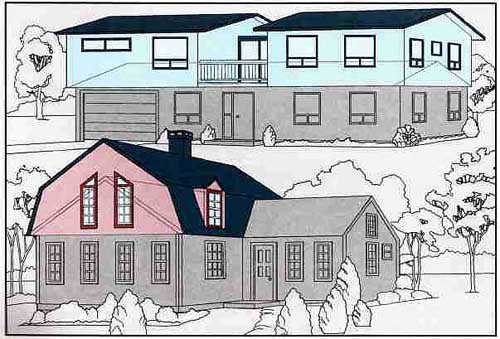
Unusual second stories.
Rather than lift the roof to stretch e house, the planners of these two examples
completely altered the original architecture with distinctive second stories.
In the upper illustration, a conventional gable-roofed ranch house was doubled
in size by building on top of it two overhanging gable-roofed wings—one for
parents, one for children—that bracket a second-floor sun deck and are connected
by a glassed-in breezeway. At bottom, a gambrel roof, assembled from a spider-web
of roof trusses to form sloping interior walls and a high cathedral ceiling,
transforms one wing of what had been a typically shaped tract house.
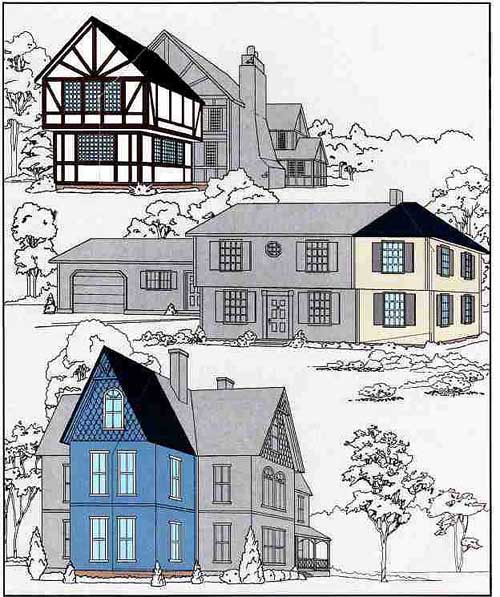
A two-story wing.
At top, a new section imitates the others of a half-timbered Elizabethan house
that already had a variety of wings; the second story of the addition overhangs
the first on cantilevered floor joists, a typical feature of this style. The
roof, siding, and windows of the addition match those on the existing structure.
On the Colonial at center, only the seam in the exterior wall gives away the
new wing, which is simply a sideways extension of the original. The hipped
roof blends the shape of the addition with that of the house. The addition
to the Victorian at bottom extends a gable of the original roof, dividing the
side of the house into three matched wings.
- -
Planning the Job to Run Smoothly
Deciding what to build is just the first step in planning an addition. You
must submit a building-permit application, accompanied by a set of precise
scale drawings of the addition. You may render them yourself or have an architect
do the work from your own rough plans.
Taking Control Yourself: You may opt to act as your own general contractor,
reserving some of the work for yourself and hiring others to do the rest. If
you take on this role, be prepared to ensure that code requirements, some of
which can be difficult to interpret, are met.
In addition to the building permit, you’ll have to acquire permits for plumbing,
electrical, and heating work. Tools and materials must be purchased, scheduling
between sub contractors coordinated, and inspections arranged.
When to Get Help: If you have limited time or expertise, hire out jobs that
call for a high level of skill or specialized equipment. Large concrete slabs,
plastering, deep excavations, and extensive grading fall into this category.
Similarly, if working at heights greater than 10 feet is disconcerting, let
someone else handle the siding and roofing jobs. Excavations deeper than 4
feet always require professional shoring.
Even if you feel up to a task, it may be uneconomical for you to take it on.
Professionals often can do jobs such as installing wallboard and shingles for
less than you would pay for materials alone be cause they buy in large wholesale
lots. Save small or complicated jobs for yourself; leave large open surfaces
that can be covered quickly to a subcontractor.
Enlisting a Contractor: Whether you are hiring a general contractor or a subcontractor,
shop around for bids on both labor and materials. Read all contracts care fully
and modify standard forms to specify your expectations for workmanship, materials,
and approximate schedules. Include an agreement that the people you hire will
provide lien waivers from their suppliers and from any subcontractors on the
job, stating that each of them has been paid.
DETAILED DRAWINGS FOR AN ADDITION
[STRUCTURAL:
KITCHEN SINK
CASEMENT WINDOW
INTERIOR DOOR
DOUBLE-HUNG WINDOW
EXTERIOR DOOR
STAIRWAY
PLUMBING:
TOILET
WASH BASIN
RECESSED TUB
ELECTRICAL:
SINGLE-POLE SWITCH
WALL-HUNG FIXTURE
DUPLEX RECEPTACLE
HEATING AND VENTILATION:
THERMOSTAT
SUPPLY DUCT
RETURN DUCT
]
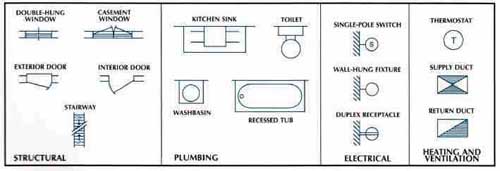
The formal language of blueprints.
These symbols represent elements commonly included in an addition. All are
readily recognized by those in the building trades, and many, such as those
for washbasins or doors, are obvious at first glance. More abstract symbols,
standing for such elements as switches or thermostats, are easy to decipher
in the context of the floor plans, elevations—showing heights of windows, doors,
and ceilings—and cross-sectional views.
17___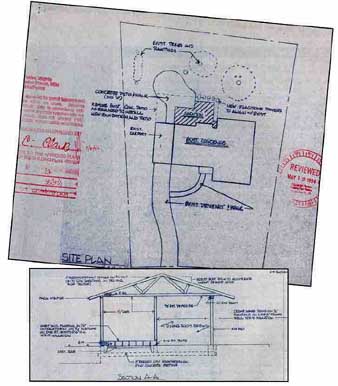
Two plans.
The site plan—depicting proposed development of the property—and the cross-sectional
view are two of many drawings submitted with an application for a building
permit. The site plan, stamped with conditional approval and a seal of review,
has a cross-hatched area showing the intended addition—at the back of the house
over an old patio, which is to be replaced by a free- form design. The cross-sectional
view includes building and materials specifications, with abbreviations for
items such as gypsum wallboard (GWB), concrete masonry units (CMU), and a grading
code for plywood roof sheathing (CDX). Other drawings may include elevations,
foundation and floor framing, roof framing, and a floor plan.
- - - -
!! CAUTION !!
Working Safely around Lead and Asbestos Lead and asbestos, known health hazards,
pervade houses constructed, re modeled, or redecorated before 1978. When disturbed,
as they are likely to be during construction of an addition, they pose a threat
unless handled as described here.
Lead is found primarily in paint. Home test kits for lead in paint are avail
able at hardware stores, or call your local health department or environmental
protection office for other testing options.
Asbestos was once a component of wallboard, joint compound, insulation, flooring
and associated adhesives, as well as roofing felt, shingles, and even flashing.
When removing small samples of such materials for testing, mist the area with
a solution of 1 teaspoon of low-sudsing detergent per quart of water to suppress
dust. Then take the samples to a local lab certified by the National Institute
of Standards and Technology.
By observing the precautions listed below, you can safely deal with lead
or asbestos-laden building materials. Or consider hiring a contractor who is
Ii censed in hazardous-substance removal or abatement-especially for a large
project indoors. A professional is advisable if you suffer from cardiac or
respiratory problems or if you don't tolerate heat well; the work requires
a tightly fitting respirator and protective clothing that is hot to wear. Tackle
a roof only if you are experienced in working at heights, keeping in mind that
a respirator impairs vision.
To remove materials containing asbestos, observe the following:
• Keep children, pregnant women, and pets away from the area.
• Always wear protective clothing (available from a safety-equipment supply
house or paint store) and a dual-cartridge respirator.
• Indoors, seal off openings to the work area from the rest of the house
with 6-mil polyethylene sheeting and duct tape. Cover rugs and furniture that
can't be removed from the work area with more sheeting and tape. Turn off air
conditioning and forced-air heating systems.
• Outdoors, cover the ground in the work area with 6-mil polyethylene sheeting.
Never work in windy conditions.
• Never sand asbestos-laden materials or cut them with power machinery. In
stead, mist them with water and detergent, and remove them carefully with a
hand tool.
• On a roof, pry up shingles, starting at the top, misting as you go. Place
all debris in a polyethylene bag; never throw roofing material containing asbestos
to the ground.
• When you finish indoor work, mop the area twice, then run a vacuum cleaner
equipped with a high efficiency particulate air (HEPA) filter.
• Take off pr clothing-including shoes-before leaving the work area. Wash
the clothing separately. Shower and wash your hair immediately.
• Dispose of the materials as recommended by your local health department
or environmental protection office.
To remove materials with lead, follow the procedures above. If you must sand,
do so with a sander equipped with a HEPA filter vacuum.
- - - -
====
Tips for Choosing a Contractor:
Examine permits on file at the building department for jobs similar in scope
to yours. Call owners of the houses for references and per mission to inspect
the jobs.
Be wary of a contractor with customer complaints on file at the local Better
Business Bureau or consumer protection agency.
Find out from the local building department or licensing bureau whether the
contractor has a trade license, evidence of having passed a competency test.
In some areas, a contractor must post a bond as insurance against bankruptcy
or other default on work.
Ask the contractor for proof of workmen's compensation and liability insurance.
A clown payment of 10 percent should be adequate on large jobs; you may stipulate
in the con tract for full payment to he postponed until the project passes
final inspection.
====
Table: SCHEDULING PERMITS AND INSPECTIONS
[Inspection:
Footing
Backfill
Slab
Rough plumbing
Rough electrical
Framing
Mechanical
Close-in
Final plumbing, electrical, mechanical, and building]
[When to call an inspector:
After preparing the trenches, but before pouring concrete;
After constructing the foundation walls and floor, but before backfilling;
After forms, gravel, vapor barriers, wire mesh, or steel are in place, but
before pouring concrete;
Underground plumbing: after installing pipes, but before filling trenches
or pouring concrete Aboveground plumbing: after installing pipes, stacks, and
vents in framing, but before walls are finished and fixtures installed.
After running cable and grounding boxes, but before walls are finished or
electrical devices installed;
After plumbing and electrical rough-in work is approved, but before insulation
or wall finish materials are installed;
After ductwork and insulation are installed, but before walls are finished
and equipment installed;
After installing all insulation material, but before installing wall or ceiling
finish materials;
After walls are finished and all plumbing, electrical, and mechanical equipment
and fixtures are installed and working, but before occupancy]
[Major checkpoints:
Excavation, soil conditions, reinforcement;
Walls, backfill material;
Forms, soil condition, reinforcement;
Stacks, vents, pipes;
Circuits, grounding;
Sizes, spacing, holes, notches;
Ductwork and insulation surrounding it;
Insulation;
Plumbing: fixtures and pipes watertight; electrical: outlets, switches, and
other devices operational; mechanical: ductwork unobstructed; building: structure
weathertight, doors and windows in operation, grading completed]
The right times for inspections.
In most areas an addition must pass several inspections before it can receive
a certificate of occupancy. The inspections are listed above in the sequence
in which they normally occur; while not all of them are required in every area,
a building permit generally requires at least four distinct inspections. These
are an inspection of the foundation work, one of the framing, one after the
insulation is in, and a final inspection when all the work is complete. The
separate permits for electrical, plumbing, or heating or air- conditioning
work also commit you to inspections of the rough installation and of the finished
work. The second column in the chart indicates the point in the construction
sequence when you must call in an inspector; the third column lists the main
features that will be checked for their conformity to building codes.
|